
ALEXANDRA TOWN – GROUP MEMBER SAYS.
‘IN MY BACK YARD’? Yes Please….
Click on images to enlarge.

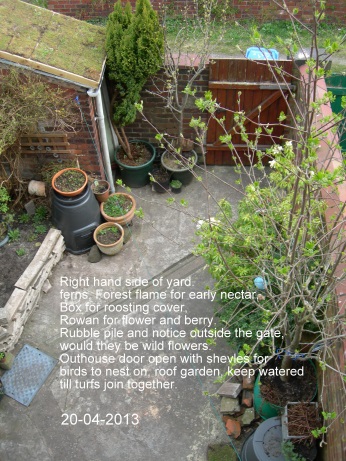

Above images were taken on 20th April 2013
Below images taken on 28th May 2013. Click on images to enlarge.


Suggestions for attracting wildlife into your own back yard, no matter how small.
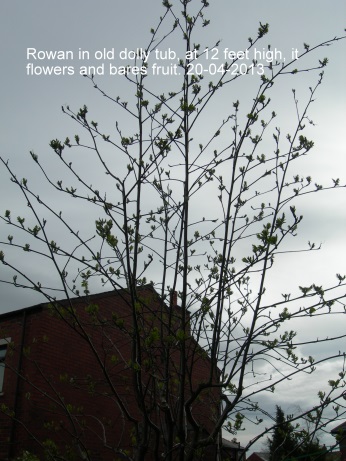
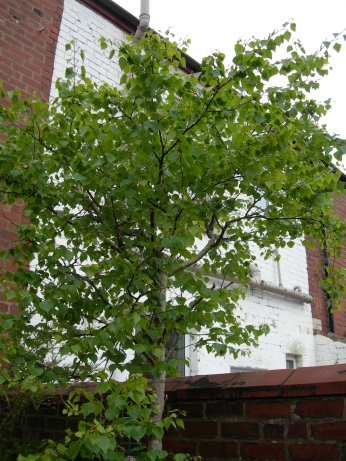
In my own I now have several trees, Silver Birch and Rowan being the largest at around 15 feet high both grown in large containers. The Birch is about 15 years old, bought as a present from a local garden centre. so maybe not native grown, native sourced, so always try to buy native grown/sourced trees or plants to avoid possibly importing insect eggs native to other countries. Holland being a large supplier of trees to Britain
Rowan was given to me as a tiny sapling.. that self seeded in my sisters garden .
Other plants have grown in with them over the years, a log in with the Birch attracts various fungi, nettles grow in with the Rowan. Saplings of Horse Chestnut in small pots, grown from collected chestnuts from local woods, awaiting either re-potting, or to be given others to plant out. Yew has been with me for several years now and looking very lovely! A box shrub and others form a fairly dense growth for birds to shelter within in all weathers, I have yet to have any nesting, I’m working on that . I lightly prune each spring, which encourages them to grow back thicker.
A good variety of birds have visited me over the years,a regular family of sparrows, a casual wren, and a Dunnock who was a lovely friendly regular, over winter. Others include a juvenile grey wagtail who again came daily over the last winter, bringing such charming beauty into the garden, feeding from food put out, and in the sink pond! A group of long tailed tits, blue tits, and only just the other day, a surprise fleeting call to feed off insects within the trees, were a pair of coal tits, they even had a quick look into the sparrow box.!! Collared dove, Wood Pigeon, and maybe the most surprising one of all came many years ago, when I got up very early one morning, can’t quite say what time of year, and there was a spotted woodpecker on the wall, wow, {not sure which one!} And last but by no means least, the sweet songster, Mr Blackbird, who would sit on the log in my birch pot last spring whilst I sat outside, and serenaded me, what joy. Thank you.. that… These are all watered well in dry weather of course, and fed a multi purpose feed in the growing

Above images were taken 20th April 2013.
Below images taken on 28th May 2013. Click on images to enlarge.

An unusual, to me anyway, insect visitor was last year early, crawling across the yard was a Cock chaffer, I had never seen one before, and was enchanted to find out what it was, apparently not that unusual, but perfect.! Out in the backs outside the gate I once counted six different type of ladybirds, amongst the nettles. That put me on added alert to watching out for the council pesticide spray team, and ask to ‘leave alone please’!
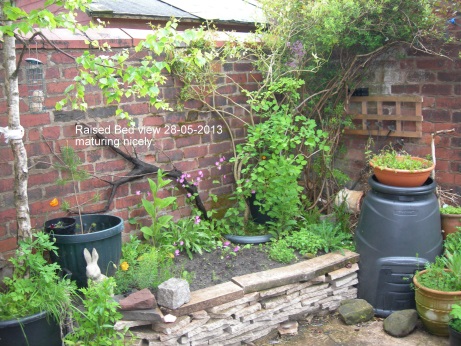
A recently created raised bed in the sunniest corner of the yard, which is now planted and seeded up with native wild flowers, to attract bee’s and butterflies and any other welcome feeders. They can grow in very poor soil, so no need to buy top of the range compost, or feed, easy eh!?
Also we have made a roof garden on top of an old outside loo! Make a wooden frame, l put a bit of plastic liner at the bottom then laid down a bit of old carpet onto the roof, put a bit of plastic liner at bottom end of roof [ if on a slope] to keep in more moisture. Place in position the wooden frame, and fill with soil, or turf. I have laid turf, and plant plugs, of wild thyme, marjoram, birdsfoot trefoil, which are ok. if it gets fairly dry. In the turf are daises clover, dandelion and Self Heal. It’s all an experiment at the moment, to see who likes living up there, and who doesn’t.
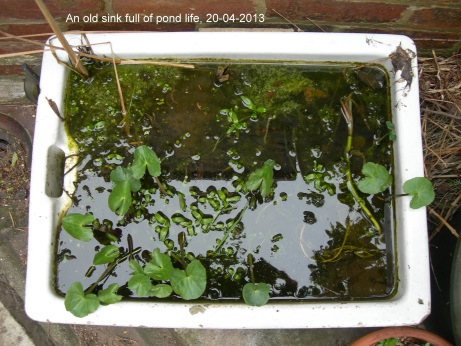
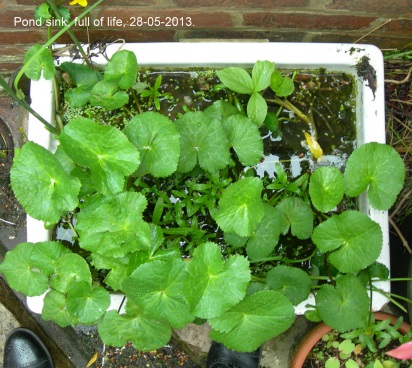
An old stone sink, filled with aquatic compost and gravel, then planted up with various water plants! Water Forget-Me-Not!, Marsh Marigold, Bog Bean, Water Hawthorn, all coming back into growth as I type. Duck Weed has also unintentionally found a home here too. This is an environment to attract any insects to lay eggs, bees to the flowers, and birds for drinking and bathing!
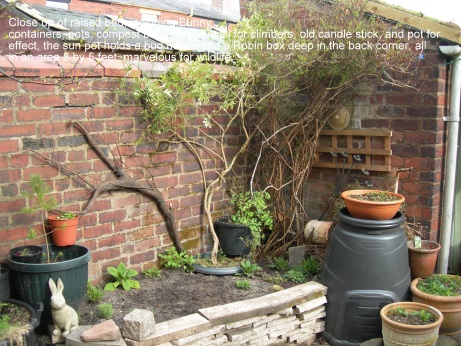
An important part of this yard is in the hidden corners, and behind containers, where leaf litter and any green cuttings, old soil, twigs, anything unused or disguarded is pushed in to make small habitat piles, for over wintering insects. Just found ladybirds! So, please don’t tidy up, just push your green litter out of sight, something will use it.. Self seeded plants appear in these soil spaces, adding a more natural appearance to the garden. And Solitary bee’s keep calling for a look too!
I also have a compost bin, for making my own compost if needed, The lid of which has been turned upside down and a pot with wild flowers placed inside, good use of space, and helps soften the look of a black bin.!
Food for birds is always available, nest box for sparrows on the north facing wall, no one resident yet though.
A couple of bird boxes are secreted at the backs of containers fairly hidden, in the hope one day a robin or other may take a liking to it. Ever hopeful.
There is just no limit to what you can try in your small back yard, to make it wildlife friendly. We have even gone out beyond the gate and into our communal backs, clearing some of the grass, litter etc, scratched down to the soil, and scattered a mix of Perennial and annual wild flower seeds, which last year made a beautiful show, and has hopefully, maybe, encouraged other people to have a go….. Life is sweet abundance, lets celebrate it wherever we live, giving something back for all we have taken.


Above images taken 20th April 2013. Click on images to enlarge.
Below some other of pictures of Alex’s Back yard, taken 28-05-2013.


So, it’s over to you, good luck, be creative, have fun, keep it mucky, native and wild. Then, Sit back and feel the Love that you have created. _________________________________________________________
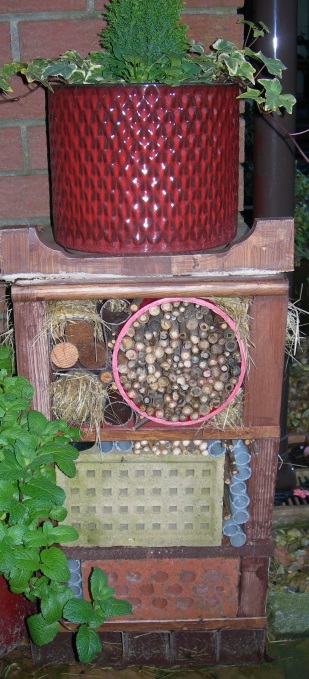
GROUP MEMBER DAVE THOMAS OPEN’S TOP CLASS HOTEL.
THE BUGRITZ HOTEL.
Exclusive to the upper crust-aceans
Group Member Dave Thomas gives us a light hearted look at his Bugritz Hotel. Then with planning permission granted added the construction details.
Amenities:
18 mole golf course with golf buggies. Private Library with volumes of Ladybird books.
Private Theatre now appearing: Dolly Parton singing Love is like a Butterfly, Adam Ant ,and of course the Beetles.
Private Cinema currently showing: Bugsey Malone, Spider man, and Batman.
Free WyFly in every room.
Free Aphid-esiacs in every room for you breeders.
Resident bed bugs in every room to make you feel at home.
Pony Trekking with horse flies included.
Outside Pool with exhibition by pond skaters.
Bell ringing by bats in the belfry.
We also have our own airfield with a squadron of mosquitoes and Tiger Moths and parachuting silkworms.
A jousting display by St George and the dragon fly. There are additions being made to the facilities hence the caterpillar tractors working outside.
All to make your stay with us comfortable. with cheep rates for birds feeding.
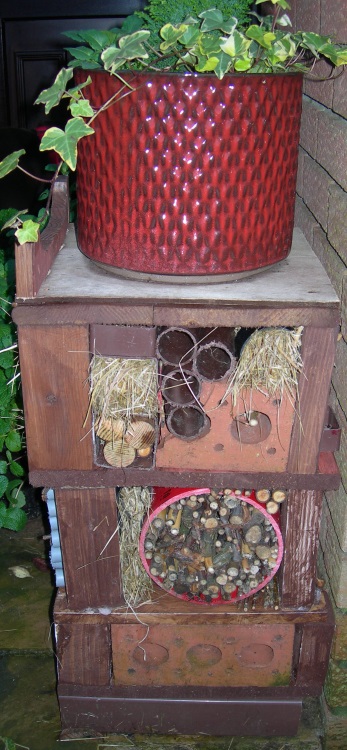
CONSTRUCTION OF THE BUGRITZ HOTEL.
We cut five 300mm (12inch) lengths of 60mm (2.5 inch) square section plastic drainpipe to form the base and damp proof course.
4 wooden shelves to act as floors
We used 3×2 inch wood for pillars holding each floor, secured with screws.
Height of each floor was measured to accommodate the largest of the habitat items eg the base to 1st floor accommodates the bricks exactly.
1st floor to 2nd floor and 2nd floor to 3rd floor exactly accommodates lengths of sewer pipe filled with bamboo sticks for solitary bees etc.
Remaining crevasses were filled with lengths of plastic waste water pipes, twigs of tree, hay and straw.
Plant Pot was placed on top of bug hotel
Overall dimensions of bug hotel : height 600 mm (24 inches), height 300mm ( 12inches) depth 300mm ( 12 inches) ( not including pot)
Total cost = zero ( materials gathered from off cuts from previous projects dating back to 1960)
Time to build = 2 days on and off over a period of 2 months
Design and architecture: Imagination stretched a bit.
 FRONT AND SIDE VIEW Click on images to enlarge. _________________________________________________________
Group Member Eddie Langrish on Wildlife Gardening . Below info Under construction.
HOW TO MAKE A WILD LIFE GARDEN.
Wild Flowers.
There are three basic types of Wild Flower Gardens you can have in your home garden, you can leave your garden to naturalise in its own time, which would be advantageous for wild life in itself.
Or you can create an Annual or Perennial wild flower area or a mixture of both, of which all will attract insects and wildlife in your garden.
You can also build a habitat pile, a pond is a must , even a pile of rocks covered in earth will help.
Annual, Perennial, or both.
An Annual wild flower as its name suggests will germinate from seed, grow to maturity, flower and produce seeds all in one season.
A Perennial Wild Flower, will from seed, produce flowers in its second year of life and flower again every year of its life, as its name suggests Per Annum.
A Biennial Wild Flower from seed, will in its first year, produced a rosette of leaf either on or close to the ground, in its second year it will produce its flower and then mostly die, some will go on to produce a flower in its third year, foxgloves sometimes do this.
How do you choose which wild flowers to use in your garden ?
Most Perennial wild flower like half to full sun. Woodland or Hedgerow
perennials don’t mind half to full shade.
Annual Wild Flowers Prefer to be in full sun, but will tolerate half sun.
Be careful when selecting your flowers, as some will not like your type of soil, ask your supplier for advice.
As a general guide :-
Half Sun means the flowers are in the sun for at least 4-6 hours a day
Full Sun means the flowers are in the sun for 6 hours plus a day.
Preparation of your area
Above – turfed area to be prepared for planting or sowing.
Above – Turf removed and area dug over several months before planting or sowing,
Preparation of an area for both Annual and Perennial are Similar.
The area you choose does not have to be large, an area of 4 square mtrs
( 6 feet by 6 feet ) be it square, rounded or shaped would be fine, a smaller area, or bigger, no matter what size of area you are able to create, you will be rewarded with hours of entertainment with glorious colours of flowers and the show, that insects of all description will give you, from spring to late Summer & early Autumn.
Window boxes, half barrels, pots, buckets, old sinks, any container with drainage holes, no matter how small will become a haven for some sort of wildlife.
Are you ready, well here goes !!!.
Annual bed preparation.
As with all preparation of any garden border, take time to take out all the “weeds” that are present.
Dig over area, and prepare to a fine tilth.
If you are using a new area in your garden, prepare the area several months before, which will allow you to remove any new weeds that germinate over this period.
Annuals do not mined a helping hand, so spread a general fertilizer at a rate of a loosely close fist per square mtr. ( do not do this for Perennial wild flowers).
Just before sowing, turn over the top 3 inches of soil and work to fine even tilth.
Your now ready for sowing.
When is the best time to Sow Annual seed, September to October or March and April, on a personal note, I prefer late March-Early April, if you sow later, then all it means is they will flower that bit later.
So you could sow up to the end of May, but watering early growth may be more important than early in the season, i.e. there may not be as much rain.
Once your annuals start to flower, you will have colour for eight weeks.
Place your Annual Mix seeds into a bucket with building sand in and mix in to distribute the seeds evenly, your sand needs to be just damp from dry.
I fined that to add a 3grm pack of field poppy at this point is advantageous.
You must spend 5 minutes mixing your seeds in the sand before spreading them and keep mixing as you spread, as the heavier seeds will work there way to the bottom of your bucket.
Click the link to see an option of seed mix.
OK, now here”s the tricky part, dispersing the seeds, you can use a mechanical spreading device, but cost and effectiveness over even spread is not good to say the least.
The group fines the best way is to, pick up a handful of the sand loosely enough in your hands so as not to compact it, but not to loose as to drop any.
Then, by shaking the hand from side to side with slight gaps between fingers, thumb end and little finger end you should get an even distribution, because of the sand you will see were you need to go back and re seed areas missed. At this point in the proceedings with your wrist movements , you may get some Fun reaction from your companions, like feeding the chickens or other imaginative little ditis.
Have a practice first with seed free sand on your distribution technique.
The faster you shake, the more even the spread.
The next stage is, using a light weighted Springbok rake on its back.
Draw the rake over the area as lightly as possible twice, this will disperse the seeds more so, ensuring an even distribution, try to keep the back of the rake, no more than 3mm deep.
The next staged is to firm down the area.
Take a plank of wood or board, place to area and push down, or walk on board once, this will put soil round the seeds aiding good germination.
Seeds will germinate about 2 to 3 weeks after the first rain has fallen, you can water yourself straight away, but please use natural water from your Butt, not from the tap
Once seeds have germinated, it is important to keep the Seedlings watered, if you get a very hot spell just after germination drying up the first half inch depth of soil, you may loose them by drought conditions.
At the end of the season, when the seeds have set, cut down and leave cuttings on ground for a week, then shake as removing.
Weed free area and you are then ready for starting the process from scratch, but you would only need to dig over the area to 4 inches deep add fertilizer, before re seeding in Autumn or the following spring.
It is known that Annual wild flower seeds can be finicky and my advice would be to sow newly bought seeds from your supplier, who has kept them stored professionally at the right temperature to aid germination.
In theory the seeds set from flowers the year before, will germinate, but you may find the stronger of the Annuals taking over as the years pass.
Perennial bed preparation. seeds, plugs plants, or 9cm pots.
Perennial Wild flowers do not like soiled filled with nutrients. Choose your site, if you are reclaiming some lawn area, remove the turfs and place to compost heap.
Do not dig the turfs into the area as they will rot down and cause Nutrients.
Dig over area, to at least a spades depth, the sub base soil will not have a many nutrients in (unless your digging over an old veg patch)and prepare to a fine tilth.
If you are using a new area in your garden, prepare the area several months before, which will allow you to remove any new weeds that germinate over this period. Though the weeds you remove are wild flowers, it is best to remove Nettle, Couch Grass, Dock, Dandelion, creeping buttercup. These can get invasive and though in them selves will attract wildlife, it may be best to take then out, unless you can keep them under control.
Now the decision is do you seed, plug plant or pot plant your area.
If you decide to use Plug or 7cm pot plants, ask your supplier if you can pick your species, as they do offer collections and some collections overlap the species , they may charge you more for their time in putting your order together, but you will not have those species that are a little less pleasing to the eye.
Seeding.
If you choose a wild flower seed collection, use the Building sand dispersement method as describe in Annual Bed Preparation.
This will undoubtedly be the cheapest method, but you have no control over what grows were unless you purchase seed in individual species. and map out patches where you wish the plants to establish.
Then there’s the thinning out of seedlings, which in order to do, you may have to walk on the area.
The outcome of collection seeding, may mean that some wild flowers will not be in the best place for them, IE amount of light, behind a taller plant, and not as aesthetically pleasing to the eye, you may want to help the wildlife in your garden, but it would be nice to be able to see the smaller wild flowers rather than them be hidden from your view.
You could choose to add 1 grm of annual seed mix per square mtr to give some flower in the first season.
On larger scale areas IE from 100 square mtrs to infinity, seeding may be the only option, base on cost., if the area is so large, then aesthetically is much less important as your view point is from all sides.
Plug Plants.
Plug Plants are the next step up in cost.
You have control of where you can position them according to their heights,tall at the back, to smaller at the front and the best place for the plant in terms of Sunlight or shade, that you have to offer.
Some plug plants will show some flower in the first year, most will flower in the second.
Remember to keep weed free, whilst your plants are establishing.
Also the term Water Well till establish is sound advice.
You could choose to add 1 grm of annual seed mix per square mtr to give some flower in the first season.
Plant your plugs at 15 inch centres apart.
If you do add an annual seed mix for some colour in the first year, spread the seeds before you plant your plugs, which will be easier to board the area, the disturbance of ground whilst planting the plugs will not deter that much from your annual flower display.
7-9 cm pot plants.
These are your most expensive way of creating your wild flower garden, but the results are much quicker.
Most, if not all will flower in there first year. and if planted in spring, will quadruple in size by the end of the growing season.
You have control of where you can position them according to their heights and flower colour.
Tall at the back, to smaller at the front and the best place for the plant in terms of Sunlight or shade.
Remember to keep weed free, whilst your plants are establishing.
Also the term Water Well till establish is sound advice.
Plant your pot plants at 15 inch centres.
At the end of the season, pending weather conditions, usually mid to end of September, cut down your wild flower area to 50mm ( 2 inches) above ground, leaving cuttings on the ground for a week , then remove.
Scratch the ground surface, and your done, apart from weeding out the invasive species that may occur, Nettle, Dock, Couch Grass, Dandelion, creeping buttercup.
However, you are wildlife gardening, so nettle is good for lots of species to lay eggs on, but contain the root area, by burying upright roof slates to help stop the spread, or use a pot.
Dandelion also a good caterpillar food plant, but remove the seed head before the seeds disperse.
Couch grass, Dock and creeping buttercup, you will have to make your own mind up on those. They will tend to crowd out the less common of your wild flowers.
Maintenance.
It is optional, will you wish to remove the more invasive species, as they appear, ie Dandelion, Dock, Creeping Buttercup, Couch Grass and Nettle.
Then at the end of September, cut the whole area down to 2 inches above ground level, leave the cuttings on the area for one week, to allow seeds to ripen and disperse, remove by raking and dispose of.
You could offer a friend the cuttings, as laid on some soil in there garden, the seeds will produce flowers for them.
Click the link to see options of plant collections.
http://www.naturescape.co.uk/acatalog/british_native_wildflower_plants_plug_collections.html
Seed Collections.
http://www.naturescape.co.uk/acatalog/british_native_wildflower_seeds_100__pure_meadow_mixes.html
HEDGEHOG HIBERNATION / NEST BOX.
The best one i have ever seen was a home made affair.
Made of 6 inch by 1 inch untreated timber, with the dimensions of 2 feet by 2 feet by 18 inches high.
It was then covered in roofing felt, placed next to the garden fence under shrubs, with a 6 by 6 inch opening positioned to the most sheltered direction and it worked every year for hibernation.
LOG PILE.
Excellent for over wintering insects, and creepy crawlies. roosting birds.
Pick a sheltered wall or fence or under a shrub, not in direct winter sunshine as this will fluctuate the temperature of your wood pile.
Better to keep the temperature more constant, rather than warming up to much on sunny winter days.
Natural hibernation spots will be out of direct sunshine.
An ideal size for your garden depends on how much space you have, if you can make a 9 cubic feet log pile, then that would be ideal, larger if you have the room.
Start by using 4-6 inch diameter logs to square off your 3 feet square area.
Using small branches cut up, place to the centre area.
Repeat the process, adding a layer or two of larger logs across the whole area at intervals to compress the smaller branches, leaf litter green or brown can be also incorporated to the pile.
When you have reach your desired height. place landscape matting to top of pile, cover with straw and 4 inches of top soil, sow wild flower seed or place grass turfs to top.
This will help keep the temperature constant, which is ideal over hibernation.
RUBBLE PILE.
Again ideal for hibernation for frogs, toads and Newts and if your lucky enough grass snakes and possible slow worms, if the latter use your Rubble pile, the former may not .
Pick your sheltered spot in your garden.
Place broken concrete products to a 3 feet diameter area to 5 inches deep.
Cover loosely with a sandy topsoil mix, repeat the process till you have a plateau cap mound of 2 feet high.
Cover in 4 inches of sandy top soil and sow wild flower seed suitable for a dry area, or cover with grass or wildflower seed turf.
BIRD BOXES.
Numerous types of boxes available.
Guides lines :- choose your Tit species boxes, with at least 5 inches 125mm depth of box below the hole.
Slate tops on boxes will be colder in winter and hotter in Summer than wooden.
A General guide on diameter of Hole .
Blue Tit 23 to 25 mm, just under an inch.
Great Tit 28mm, 1 and one quarter inches.
Nuthatches will enlarge the hole to suit, as will all the tit family.
Plied timber is not great and is very difficult for the birds to shape the hole to custom.
Ornamental fancy boxes, with squirrels, birds, weather veins on are not far short of useless.
Position the hole of the box, out of direct sunlight and out of prevailing
sou westerlies that mostly produce rain.
Make your own from 150mm, (6 inches) by 18mm (3/4 inch) untreated wooden planks, slope the roof backwards from the hole, giving an area inside of 150mm ( 6 inches) by 112mm ( 4.5 inches).
Allow the lid to be screwed into place , to allow cleaning out of the box late September.
Remember, most tits pick their nesting sites late Feb and start building thier nest approx Mid April and many birds could use them as roosts in the winter months.
WATER IN THE GARDEN.
Water in your garden is a fantastic place for wildlife and will attract all sorts of wild life into your garden, the list is endless.
From the local bird population bathing or drinking there fill, to the Daphne dancing in the shallows. http://en.wikipedia.org/wiki/Daphnia
Containers.
Containers of all sizes from old sinks, to plastic boxes, buckets set at just above ground level in your garden and planted up with a few Marginal plants will give you hours of entertainment.
Ponds.
A pond in the garden is a must have item for attracting wildlife.
The best position for it is in as much sunlight your garden position will allow.
You can never put fish in a wildlife pond, as they will eat a large, if not all of your Tadpoles, larva, insects etc. If your going wild, Don’t put fish in.
Areas of your pond need to vary from shallow to varying depths up to 2 feet 6 inches deep, 3 feet would be better.
You could try to create a natural balancing pond or position a water fall, with a filter box with Ultra Violet light which will kill “green Water “. which is caused by single-celled algae, which remains suspended in the water. If conditions are right in a pond, i.e., there are plenty of nutrients and sunlight, as many as five million algae cells per millilitre of pond water can be present. These organisms are so tiny, they pass through even the finest filter. The Ultra Violet light will kill them as they pass by it.
To natural Balance your pond, you will need to place marginals plants, oxygenaters, Lilies, as Green Water does not like Oxygen, and needs sunlight, which when Plants cover some surface area, will lesson sunlight into the pond.
A water fall will aid oxygen content of water as it babbles down to the pond, like a stream into a natural pond.
A natural balance pond will take one to two years to have clear water, but as plant material, bug poo, dust from the atmosphere rot down, they will cause nutrients, which will cause an Algae bloom, which will only last the amount of time it takes the algae to use up all the nutrients in the water that the rotting debris made and then it will die and your water become clear again.
Question you may wish to ask yourself before you lunge in with the excavator, weather it be your spade or mini or large excavator.
Where shall I put my pond – in a sunny spot.
What surface area and shape – as small or as big as you like.
What depths – From 4 to 9 inches with an area at 3 feet. make sure you
have a slopping shallow end for easy access by frogs,
Toads and newts. or build a stone staircase, if you define
your pond edge with natural stones or a concrete
product
Mark your pond area out with a peace of string or hose pipe.
Dig off the grass turfs as required.
When your Happy with the shape of it, think about various depths, for plants and pond life, mark with a line of building sand within your shape, areas, slopping from nil inches to 4 inches over 6 inch minimum distance, if your placing turf to finish the edge of your pond off, if your using stone work, you can build a stone ladder just before filling your pond.
Have terraced depths at 9 inches and then your 3 feet depth for your lily and over wintering pond life.
Do not use 1000 gauge polythene for your liner, this will crack after a few years with the evaporation and rainfall softening and hardening it where exposed to the sunlight.
Buy a Butyl Liner or now a days, you can get a polyester reinforced PVC liner with 45 year guarantee at a reasonable price, ask your supplier regarding strength for your depth and pressure of water.
http://www.fawcettsliners.co.uk/Category.aspx?id=9
So your ponds dug out, now its time to check for any sharp stones etc that may puncture your liner.
I still like lining my ponds with 2 inches of building sand before placing the liner, but you can get pond liner underlay at a reasonable price.
Once you have place your Underlay to the pond shape and your liner across the area, place the hose pipe and start to fill your pond, ensuring that any creases can be folded neatly and tightly by you as the pond fills.
the wildlife wont mined about any creases in the liner, but you may.
At this stage leave the water level at 4 inches below finished water level.
If your turfing up to the pond edge, you should have already leveled the ground round the pond, pull straight the pond liner over the ground, place turf to hold liner down, repeat till you have turfed all round the pond and then fill up to just below the turf, at This stage you will have some soil running into the pond from your turfs, don’t worry, it will settle, or you could empty and refill your pond.
You could watch the depth of water and keep it away from the turf until your turfs have rooted, this will help stop soil running into the pond.
Make your turfs 4 inches deep and ensure that 6 inches of turf over laps the liners.
Where the turf does overlap the liner, this is the place that will brown off
in hot weather, keeping you pond topped up in hot weather will stop this happening.
Stone edging your pond, select and position your stones, dry or mortared, then fold up the liner at the back, pushing soil or turfs into position to hold liner in place, then fill your pond to max, but if you use mortar, wait till this has hardened before filling.
To much spillage of mortar in the pond will result in emptying and refilling the pond again.
Tip:- Just in case, when digging your pond, dig out an area deeper than the surrounding area to allow a plastic container or Tea Mug to get the last of the water out, be sure to swill down edges of the liner to rid area of cement residue, ( see Pond Rehash for more details and tips )
Leave the water for one to two weeks before planting to allow chemicals in the Tap water used to dissipate.
If you have a friend who has an established wildlife pond, you could take a bucket of water from that pond and place to yours, the microscopic life in that established balanced water, will help the balancing of your pond, but remember, it will also carry spores of Green algae and possibly Blanket weed, ( checking first may be an idea ) , but you will undoubtedly get green water and Blanket weed in your pond over its life period.
Planting your pond, sinks, barrell.
If your container is reasonably small, you could use rain water captured by what ever method necessary to fill your containers.
If you have to use tap water, leave it to stand for a week or two in an other container, ( not the one you are using for your pond life)
Then place your plants into your container and pour as steady as you can your rain or stood tap water to fill it up.
Choosing what plants :- the options are endless, though you must add Oxygenaters and some would say a lily is a must. after these two, the choice is down to the individual, Water Mint and Water forget me not, are common place and serve nectar up as well, as do most marginal plants.
You can buy marginals ready to go into your pond already in baskets, or plug plants can be purchased, along with the baskets and Aquatic soil and you can have fun planting them up.
Tip – Place your newly planted marginals into a container of water to allow the oxygen in the soil to escape, leaving this to be done in your pond or container will result in soil black water with the oxygen escaping.
See http://www.naturescape.co.uk/acatalog/british_native_pond_plants_aquatic_marginals.html
Or you could make the shallow area of your pond a bog garden, placing soil directly into the pond, before you fill it with water and planting directly into it, however in doing this, if you ever want to change the plants, you will find that the matted roots will make all plants come out together in one big lump and the more invasive species will maybe take over, this method is great for large ponds, but for small garden ponds, I would recommend using plants in baskets.
Or build two areas, one as a pond with marginals in baskets and an other for a bog garden area.
Read your planting depth instructions, they will say several options, level with the surface water, 50mm/2 inches below the surface, up to 18 inches below the surface, up to 3 feet below the surface with some Lily species.
When the plant label says ‘ up to a depth of ‘ it will be beneficial to a newly bought plant if you place it higher in the water than at its maximum depth, this can be done with placing a smooth brick under the plants basket, after a year or two dropping the marginal to its maximum depth.
Maintenance / Pond rehash.
Cut any brown, dead vegetation, keep one third of your surface area clear of any growth, be very careful when using your scissors or secateurs, remember constantly if your pond has a liner.
If your pond does spring a link, then see your supplier, you will fine that they have repair kits for most liners, your problem is just finding the leak, but dont get mixed up with natural evaporation, on a pond surface area of 24 square feet, with summer temperatures you can loose an inch or two in ten days, if you have a water fall evaporation will be greater as the thin covering of water heats up from running over and down your falls.
Top up evaporation with rain water or if you must, use tap water. Is it time to install a water butt ?
If you ever feel the need to rehash your pond and start again, then save your plants, divide and replant, giving away the ones you don’t want, oh and you will be glad of that deeper bit to get the last bits out, to remove the silt which will have built up, use a soft brush, to bring it together.
You never need to re hash your pond, but after many years the silt will have built up and it’s your decision on the total rehash.
Remember to keep a bucket or two of your old pond water to put back into your new water you use.
Pond life.
The life in your pond will start as soon as you put some plants in, if not before.
Your bought in marginals will no doubt have pond life in them, Dragon Flies, Darters and Mayflies may appear.
Frogs, will eventually find your pond, maybe toads to if your lucky and then there’s newts, which you will be very lucky to get.
It is illegal to transfer frog spawn from one pond to an other and should not be done, because your ‘native frog crowd ‘ may be disease free and the imported spawn may not be, the local frogs will find your pond and as such you will be able to revel in the fact that they choose your pond, you did not choose your pond for them.
Newts of all species can not be moved from one pond to an other by law,
Let them choose you, not you choose them, even a friends pond with newts in, leave them there, if they don’t like your water, they will soon move out and or die because of the lack of food etc.
Your pond will give you loads of enjoyment and you will be part of the biggest pond area in Britain.